Recently I installed Linux Mint on my laptop after years of being a windows user, it was quite the learning curve. I decided to install a secondary Linux distribution to disk in case anything untoward happened to my file system. I chose Kali Linux to be that distribution, as most aspiring nerds do I daydreamed of ethical hacking and general I.T badassery. All these dreams came to a crashing halt when I struggled for hours to get the image to boot via UEFI from my USB thumbstick.
Like many other “power” users, I did not need guides:
- Burn .iso to USB using software of your choice (in my case unetbootin),
- Plug USB into laptop,
- Reboot
- Done.
Except it did not work, it did not detect the USB and continued to boot into Linux Mint. I initially turned to my old friend Google, who pointed me in the direction of This guide to booting in UEFI which does a really good job of explaining what needs to be done. Except it didn’t work for me, adding the text file named grub.cfg in /EFI/Boot on the USB did not yield the results I had hoped it would.
I came up with this workaround to put the grub.cfg and grub.efi onto the systems boot partition and point it back to the USB for its source. Here forms the topic of this post in a hope that you don’t have to spend the time I did, getting this to work, you can instead spend that time hacking the mainframe!
Some specifics around the gear I was using:
- USB - sandisk cruizer 16gb
- Laptop - HP Pavillion g7 with Linux Mint Sarah installed
- Kali Linux - 64-bit version 2017.1
- Firstly the USB must be formatted in FAT32 before burning the .iso to it.
-
I went to my Mint distributions /boot/efi/EFI folder and created a /kali/ dir
sudo cd /root/efi/EFI/ sudo mkdir kali/ sudo cd kali/ - Here I created the following files:
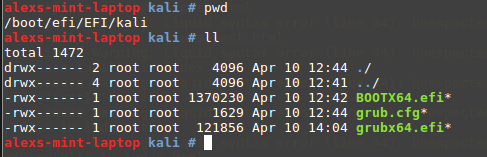
Which can be found here -
I then replaced the contents of grub.cfg with:
# Config file for GRUB2 - The GNU GRand Unified Bootloader # /boot/grub/grub.cfg # DEVICE NAME CONVERSIONS # # Linux Grub # ------------------------- # /dev/fd0 (fd0) # /dev/sda (hd0) # /dev/sdb2 (hd1,2) # /dev/sda3 (hd0,3) # # root=UUID=dc08e5b0-e704-4573-b3f2-cfe41b73e62b persistent set menu_color_normal=yellow/blue set menu_color_highlight=blue/yellow function load_video { insmod efi_gop insmod efi_uga insmod video_bochs insmod video_cirrus insmod all_video } load_video set gfxpayload=keep # Timeout for menu set timeout=5 # Set default boot entry as Entry 0 set default=0 set color_normal=yellow/blue menuentry "Kali - Boot Non Persistent Mode" { set root=(hd0,1) linuxefi /live/vmlinuz boot=live noconfig=sudo username=root hostname=kali initrdefi /live/initrd.img } menuentry "Kali - Boot Persistent" { set root=(hd0,1) linuxefi /live/vmlinuz boot=live noconfig=sudo username=root hostname=kali persistence initrdefi /live/initrd.img } menuentry "Kali Failsafe" { set root=(hd0,1) linuxefi /live/vmlinuz boot=live config memtest noapic noapm nodma nomce nolapic nomodeset nosmp nosplash vga=normal initrdefi /live/initrd.img } menuentry "Kali Forensics - No Drive or Swap Mount" { set root=(hd0,1) linuxefi /live/vmlinuz boot=live noconfig=sudo username=root hostname=kali noswap noautomount initrdefi /live/initrd.img } menuentry "Kali Graphical Install" { set root=(hd0,1) linuxefi /install/gtk/vmlinuz video=vesa:ywrap,mtrr vga=788 initrdefi /install/gtk/initrd.gz } menuentry "Kali Text Install" { set root=(hd0,1) linuxefi /install/vmlinuz video=vesa:ywrap,mtrr vga=788 initrdefi /install/initrd.gz } - Taking care to replace the (hd0,1) references with ones that pointed to my USB drive, in my case my usb was sdb1 which is hd1,1 in grub.cfg speak.
- I then rebooted my laptop and booted into BIOS (in my case hitting f12 while booting)
- I then selected Boot from UEFI file.
- I then browsed the folder structure presented to me (which should be the folder structure we made earlier on the boot partition) until I found /efi/EFI/kali/grub64.efi
- Select grub64.efi and Bam! I had a grub Kali boot screen.
- A few next, next, finishes and we were away!
I hope this helps you if your having issues getting Kali to boot.
Until next time :-)